The Ultimate Guide to Crafting With Plastic Bottles (Parents Will Love #3)
Crafting with plastic bottles opens up a world of creativity for you and your kids. Transforming mundane waste into vibrant crafts offers an engaging way to teach the importance of recycling. Follow these simple steps to get started.
Step 1: Gather supplies
Collect empty plastic bottles, scissors, paint, and any decorative items like markers, glitter, or stickers. Think about different bottle sizes. Smaller bottles work great for simple projects, while larger bottles allow for more intricate designs.
Step 2: Choose a project
Decide on a project that sparks your child’s interest. Popular ideas include making flower pots, bird feeders, or even fun piggy banks. Encourage your kids to brainstorm ideas. Using their imagination fosters creativity and personal connection to the crafts.
Step 3: Prepare the bottles
Wash and dry the plastic bottles thoroughly. Cut them into the desired shapes, ensuring you supervise any cutting to maintain safety. You can create various designs by shaping the bottles uniquely. For example, cut the top off to make a simple flower pot or carve a larger opening for a bird feeder.
Read also: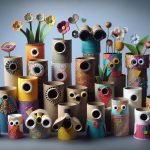 Trash to treasure: surprising uses for toilet paper rolls
Step 4: Decorate with flair
Let creativity flow as you and your kids embellish the bottles. Use vibrant paints and shiny stickers to make the projects visually appealing. Engage them in discussing why certain colors or designs appeal to them. This interaction deepens their understanding of aesthetics.
Step 5: Display or gift your creations
Encourage your children to display their finished masterpieces around the house or gift them to friends and family. Showing off crafts boosts their confidence and pride in their work.
Introduction
Crafting with plastic bottles turns waste into treasures. You unlock creativity while teaching kids about recycling. Imagine transforming an ordinary plastic bottle into a colorful bird feeder.
Gathering materials comes first. Look for items like scissors, paint, glue, and markers. These basic supplies lay the foundation for your projects. You create a workspace that encourages imagination by organizing everything within reach.
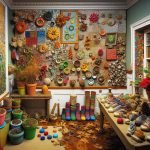
 Recycled crafts that actually look good enough to display at home
Choosing fun projects adds excitement. Options include making flower pots, jewelry holders, or even toy organizers. Each project offers a unique opportunity for kids to express themselves.
Preparing the bottles requires safety and precision. Rinse them thoroughly to remove labels and residual contents. Cut them carefully to avoid injuries. Each cut leads to endless crafting possibilities.
Decorating your creations lets kids shine. Painting the bottles in bright colors or adding stickers instantly brings their ideas to life. The more unique the design, the prouder they will feel once finished.
Finally, displaying or gifting the crafts showcases hard work and creativity. Placing their finished projects around the house or sharing them with friends fosters pride. Emphasizing the importance of reusing materials not only enriches their understanding but also encourages a sustainable mindset.
 The weirdest materials for amazing crafts you need to try
Benefits of Crafting With Plastic Bottles
Crafting with plastic bottles offers numerous advantages that resonate with both environmental concerns and creative expression.
Environmental impact
Creating crafts from plastic bottles plays a significant role in reducing waste. Approximately 30 million tons of plastic are discarded in the U.S. annually. By repurposing these bottles, you divert them from landfills, contributing to a cleaner environment. Imagine transforming used bottles into vibrant planters or unique storage solutions. Each craft project not only promotes creativity but also teaches children the importance of sustainability. When kids grasp the value of reusing materials, they develop eco-conscious habits early in life. This fosters a mindset focused on environmental stewardship that can last a lifetime.
Cost-effective creativity
Crafting with plastic bottles is an excellent way to explore creativity without very costly. Materials are often already at home, making it a cost-effective choice for parents. You can transform simple items into intricate art pieces or functional crafts. For example, you might use a bottle cap as a colorful button for a homemade puppet. Engaging in these creative projects nurtures your children’s artistic skills and problem-solving abilities. Each craft becomes a unique piece infused with imagination and resourcefulness, reinforcing the idea that art doesn’t require expensive supplies.
Explore more crafty activities on Crafty Corner for Kids, where you’ll discover even more engaging projects and ideas that keep creativity flowing.
Read also: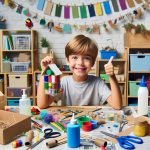 Why recycled crafts can boost your kid’s creativity today
Materials Needed
Gathering the right materials sets the stage for your crafting adventure. With the proper items at your fingertips, creativity flows.
Types of plastic bottles
Focus on collecting various types of plastic bottles. Water bottles, soda bottles, and juice containers provide excellent starting points. Choose bottles with different sizes and shapes for diverse projects. Thicker plastics, like soda bottles, lend themselves well to cutting and shaping. Thin plastic, such as water bottles, works perfectly for painting and decorating. By using an assortment of bottles, you unlock endless crafting possibilities that spark your child’s imagination.
Tools Required
Gathering tools speeds up the crafting process. With the right equipment, crafting with plastic bottles becomes fun and rewarding. Here’s what you’ll need.
Cutting tools
Cutting tools make transforming plastic bottles easier. You can choose from scissors or utility knives. Scissors work well for thin plastics, while utility knives are great for thicker materials. Ensure safety by using tools designed for kids when crafting with younger children.
To enhance your abilities even more, consider using a cutting mat. This protects your surfaces and ensures even cuts. Plus, safety goggles add extra protection for little eyes during cutting sessions. Have a few choices at hand, so everyone can participate in crafting adventures. For example, scissors come in various designs, making them exciting for kids.
Decorating tools
Decorating tools bring your creations to life. A variety of paints, markers, stickers, and glue enhance the look of your crafts. Non-toxic paints work best since they are safe for children. Opt for bright colors to attract attention and spark creativity.
Think about using fabric scraps or magazine clippings for added texture and dimension. Kids can layer these materials to create unique designs. Paintbrushes also come in different sizes. A fine brush allows for detail work, while larger brushes cover areas quickly.
Crafting Techniques
Exploring various crafting techniques enhances creativity and transforms plastic bottles into art. Each method provides unique opportunities for children to express themselves while learning new skills.
Basic cutting and shaping
Cutting and shaping provide the foundation for crafting with plastic bottles. Use scissors for precise cuts and utility knives for more complex shapes. For example, a soda bottle can become a flower pot with a few simple cuts at the top. Advice includes making safe cuts by stabilizing the bottle on a cutting mat.
Shapes can vary from simple cylinders to intricate designs. Start by demonstrating how to cut the bottles correctly. Explain that thicker plastics are easier to shape, making them ideal for beginners. Encourage kids to experiment. They can create toys, decor, or functional items. Safety measures, like wearing goggles, are essential during this phase.
Painting and decorating
Painting and decorating allow children to bring their creations to life. Begin by laying down protective sheets to avoid mess. Using non-toxic paints, such as acrylic or washable markers, sparks creativity. For instance, water bottles can become colorful flower vases with a splash of paint. Encourage kids to blend colors or add patterns for unique looks.
Stickers, fabric scraps, and sparkles add texture and personality. Recommend creating themes, like nature or favorite animals, to inspire projects. Transform bare bottles into art pieces that reflect their interests. Remind them that the process is just as important as the outcome, allowing freedom to make mistakes and learn.
Joining techniques
Joining techniques help connect parts of recycled materials seamlessly. Use hot glue for strong bonds, but ensure adult supervision while working with heat. Crafting options include combining bottle parts to build various structures or even assembling multiple bottles into larger creations.
For example, two bottles can create a fun space ship for imaginative play. Explore using string or yarn for a softer connection. Show kids how to thread yarn through holes they make, adding a tactile element to their projects. Encourage collaborative crafting sessions; these opportunities forge friendships and foster teamwork.
Project Ideas
Engaging with plastic bottles opens up fun and unique crafting opportunities. Here are some creative projects to inspire your crafting journey.
Project 1: Plastic bottle planters
Transforming plastic bottles into colorful planters adds life to your home. Cut a bottle in half and use the bottom part for planting. Decorate it with paints or markers to make it vibrant. Drill or poke drainage holes in the bottom to prevent overwatering.
Plant easy-care herbs like basil or mint. These not only look good but also provide fresh flavors for your meals. Using recycled materials promotes environmental awareness, making it a perfect project for kids.
For a fun twist, gather several planters and create a mini garden. Arrange different plants for a bright display. Collaborating like this encourages teamwork and allows children to see their hard work grow!
Ready for more ideas? Explore Crafty Corner for Kids for even more engaging activities that inspire creativity and resourcefulness among your little ones.
Project 2: DIY Bird Feeders
Creating a DIY bird feeder from plastic bottles brings joy to children and birds alike. You can easily transform simple materials into something beautiful while nurturing an appreciation for nature.
Materials and instructions
Gather these materials: a plastic bottle, twine or string, a pair of scissors, a wooden spoon, birdseed, and paint for decoration. Start by rinsing the bottle thoroughly. Cut one or two small holes in the sides, about one-third of the way up from the bottom, to allow the seeds to pour out. Insert the wooden spoon through the holes to create a perch for the birds.
Next, fill the bottle with birdseed and cap it tightly. Attach the twine or string at the top of the bottle for easy hanging. Decorate the bottle using bright paints or fun stickers to make it visually appealing. Hang it from a tree branch outside, and wait for your feathered friends to arrive. This craft not only beautifies your yard but also attracts delightful wildlife.
Warnings and safety tips
While crafting, safety comes first. Always supervise children while they use scissors, ensuring they’re using them appropriately. Choosing kid-friendly scissors reduces the risk of injury. When painting, opt for non-toxic paints to keep it safe for little hands and the environment.
Also, ensure the bottle is clean and free from sharp edges after cutting. Place the bird feeder in a secure spot where it won’t tip over easily. Be mindful of your pet’s behavior; positioning the feeder away from where pets roam helps keep the birds safe. Follow these tips, and enjoy crafting with confidence!
When you finish making your bird feeder, think about exploring other crafting projects on Crafty Corner for Kids. You’ll discover endless fun and educational activities that integrate creativity and learning.
Project 3: Plastic Bottle Storage Containers
Creating storage containers from plastic bottles adds organization to your kid’s space while fostering their creativity. This project is straightforward and allows for endless customization, making it a perfect craft from Crafty Corners for Kids.
Materials and instructions
Gather essential materials: empty plastic bottles, scissors, permanent markers or paints, decorative stickers, and glue. Start by rinsing and drying the bottles. It is safer to cut the bottles when they are dry. Use scissors to remove the top third of the bottle, creating an open container. You can also leave the bottle whole for a taller storage option.
After cutting, let your kids decorate the containers. They can paint vibrant designs, draw patterns, or stick on memorable images. Allow the paint to dry for at least one hour. For added stability, consider gluing a circular piece of cardboard to the bottom. This keeps the containers sturdy and prevents tipping when filled. These fun creations serve functional storage for crayons, small toys, or craft supplies—everything in its right place.
Customization ideas
Encouraging creativity is key to this project. Personalization can make the containers even more engaging. For example, paint each container in a different color for a vibrant collection or assign colors to specific categories, like blue for crayons and red for markers.
Try adding names or favorite characters stickers. This not only makes each container uniquely theirs but also helps kids learn organization skills. You can even upcycle the bottle caps by decorating them and attaching them to the lid.
Consider including a chalkboard label on the side of the container for easy labeling. Kids can write their names or what’s inside, offering an interactive element. Encourage your little ones to experiment since every container offers a new canvas. Enjoy all the crafty possibilities and explore more creative ideas at Crafty Corners for Kids.
Troubleshooting Common Issues
Crafting with plastic bottles can sometimes present challenges. Understanding how to troubleshoot common issues enhances your crafting experience. Here are some effective solutions.
Difficulty in cutting bottles
Struggling to cut plastic bottles can cause frustration. Ensure safety by using sharp scissors or a utility knife. If cutting proves difficult, try warming the area to be cut with hot water. This softens the plastic and makes cutting easier. For cleaner edges, score the bottle lightly before applying more pressure. Consider using a cutting board to stabilize the bottle as you work.
If you’re working with kids, encourage them to ask for help if they feel unsure. Creating a supportive environment improves confidence. Remind them that practice helps. Over time, they will become experts in cutting bottles for their crafty projects.
Issues with adhesive
Using the right adhesive ensures strong creations. Some adhesives may fail, causing frustration. For crafting with plastic bottles, hot glue provides a strong bond. It works well for joining heavier pieces. Avoid using school glue, as it may not hold adequately if parts are pulled apart.
Test adhesives on scrap pieces first. This helps you see how well they adhere. If an adhesive creates a mess, try applying it in small dots instead of a continuous line. Children can enjoy exploring what works best. Dealing with adhesive mishaps builds resilience and ensures learning.
Alternative Methods
Explore creative ways to repurpose not just plastic bottles but various types of plastics. Upcycling other types of plastics expands your crafting possibilities. Consider items like yogurt containers, milk jugs, and even food packaging. Each piece holds potential for your next creative project. For instance, cleaning out an empty yogurt container can lead to vibrant flower pots. Simply paint them with go-to colors and add soil. These projects not only engage kids but also teach them about the many ways plastics can be reused.
Upcycling other types of plastics
When it comes to crafting, think beyond traditional plastic bottles. Transform items like detergent bottles into fun scavenger hunts. Create a game by cutting holes in containers, adding colorful balls, and tasking kids to toss them in. This simple change boosts fun and keeps your home clutter-free. You could even construct bird feeders using empty milk jugs. Cut a side opening, secure it to a tree, fill it with birdseed, and watch nature come alive.
Using bottles in mixed media projects
Integrating plastic bottles into mixed media projects creates a new dimension of fun. Combine bottles with cardboard, paper, and even fabric scraps for exciting artistic expressions. Picture a colorful vase made from a plastic bottle wrapped in bright fabric, adorned with buttons and twine. This bold blend enhances creativity and fosters critical thinking.
Encourage kids to explore textures and colors, fostering a playful environment. Branch out into DIY sculptures by stacking and gluing multiple bottles together. For example, form a unique robot or creature and paint it accordingly.
Head over to Crafty Corner for Kids for more innovative ideas waiting to inspire your next crafting session.